How to Clean a Cake Pop Maker
Recommended picks

What You Need Before You Start
Gather a few simple supplies so the process goes smoothly: soft cloths or paper towels, a silicone spatula or wooden skewer for stubborn bits, warm water, and a drop of dish soap. Avoid abrasive scrubbing pads, steel wool, or harsh cleaners, because they scratch the nonstick surface on most cake pop plates. A small pastry brush can also help sweep dry crumbs out of the round cavities without scratching. Having everything at hand before you begin means you finish faster and the appliance stays in better shape over time.
Cooling and Unplugging: The First Step
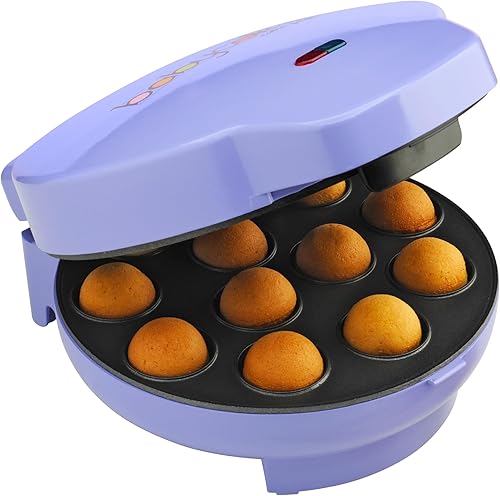
Before touching the plates, unplug the maker from the outlet and give it a full 15 minutes to cool down. Plastic-bodied units like the Babycakes CPM-20 (1.7 lb, 500 W) and the Disney DCM-8 (1.0 lb, 500 W) retain surface heat longer than you might expect despite their light weight, so do not rush this step. Cleaning while warm can drive batter deeper into crevices or warp the plastic housing. Place the unit on a flat, stable surface so it does not tip while you work.
Removing Loose Batter and Crumbs
Once cool, open the lid fully and use a dry paper towel or soft cloth to wipe out any loose crumbs from each cavity. A silicone spatula is ideal for scooping batter that pooled at the bottom of a mold without scratching the surface. For small crumbs wedged between cavities, a dry pastry brush works better than a cloth. Shake nothing over a sink with the unit open, since water can drip inside and reach the heating element. Dispose of dry debris in the trash before introducing any moisture.
Tackling Stuck-On Batter
If batter has baked onto the plates, dampen a few paper towels with warm water and lay them flat over the cavities. Close the lid gently and let the moisture soften the residue for 3 to 5 minutes. Open the lid and the stuck bits should wipe away easily with a soft cloth. For stubborn spots, dip a wooden skewer or the tip of a silicone spatula in warm soapy water and work around the edge of each cavity. Avoid pressing hard on the center of the mold where the nonstick coating is thinnest. Repeat the damp-towel method rather than scraping with force.
Wiping Down the Exterior and Hinge Area
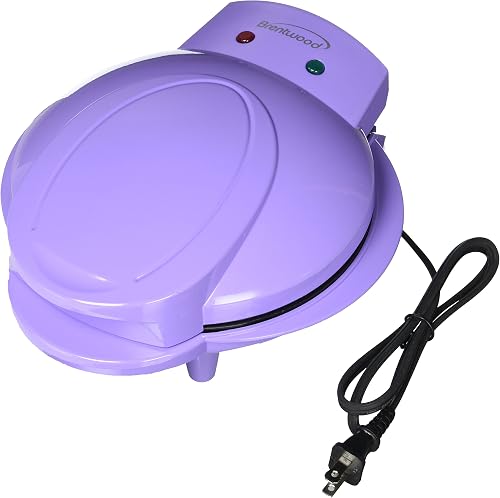
After the cooking plates are clean, move to the outside shell. Use a cloth barely dampened with warm soapy water to wipe the lid, base, and sides. Pay attention to the hinge area, where overflow batter commonly drips and then dries into a hard film. The Brentwood RA34795 (2.7 lb, 1000 W) and the Babycakes CP-12 (3.6 lb, 800 W) both have slightly larger footprints and more hinge surface to clean. Dry everything immediately with a clean cloth. Leaving moisture on any plastic housing can cause discoloration or create a sticky residue over repeated use.
Storage and Ongoing Maintenance
Store the maker in a dry spot with the lid closed to keep dust out of the cavities. A light wipe before each use removes any dust that settled since last time. If you bake frequently, a quick wipe-down immediately after each batch, once the unit is unplugged and cool, prevents buildup from hardening over multiple sessions. Nonstick coatings last longer when you use silicone or wood tools rather than metal. Units with stainless steel accents, like the Holstein Housewares HH-09037023L (3.9 lb, 760 W), can tolerate a slightly damp exterior wipe, but the interior plates still need the same gentle touch as any nonstick surface.
Common mistakes to avoid
- Submerging the unit in water or running it under the tap, which can damage the heating element and create a safety hazard.
- Cleaning the plates while they are still warm, which spreads soft batter deeper into crevices and can cause minor burns.
- Using metal utensils or abrasive pads to scrape stuck batter, which scratches and eventually ruins the nonstick coating.
- Leaving moisture inside the cavities after cleaning, which can cause rust on metal components or mold on plastic housing over time.
- Applying cooking spray directly to the plates before each use rather than using a brush, because spray buildup becomes a sticky brown residue that is difficult to remove.
- Skipping the hinge and outer shell in the cleaning routine, allowing batter drips to harden and become much harder to remove later.
Frequently asked questions
Can I put my cake pop maker plates in the dishwasher?
Most cake pop makers have non-removable plates that cannot go in the dishwasher. The entire unit should never be submerged or placed in a dishwasher. Stick to damp cloth cleaning to protect both the nonstick coating and the internal wiring.
How do I get baked-on batter out of the round cavities?
Lay a damp paper towel over the open plates for a few minutes to soften the residue, then wipe with a soft cloth. A wooden skewer or silicone spatula tip works well for the curved sides of each cavity without causing scratches.
How often should I clean a cake pop maker?
Clean it after every use. Even if a batch looks tidy, small traces of batter and sugar can burn onto the plates during the next session and become much harder to remove. A quick wipe while still fresh takes under two minutes.
Is it safe to use dish soap on the cooking plates?
A small amount of dish soap on a damp cloth is fine. Avoid soaking the plates or letting soapy water run into the unit. Rinse the cloth well so no soap residue remains on the surface before the next bake.
My cake pop maker smells burnt after cleaning. What should I do?
A burnt smell usually means some batter or moisture was left near the heating element. Let the unit air out unplugged for a day. Run it empty for one short cycle in a ventilated area to burn off any remaining residue, then wipe the plates again once cool. If the smell persists, contact the manufacturer. Questions about care tips can also go to hello@chpizza.com.